By Randy Brunette
Posted on Wednesday, December 15th, 2021

Vehicle lettering makes up a good deal of my business, and most of it is on vans and pickups. Occasionally, though, I’ll do a bus or large truck like this one. When pricing one, I’m careful to accurately determine the total square footage of the vinyl area. I always take digital photos and get measurements of vehicles before I do them, and I design the new vinyl graphics right over the photos on my computer for customer approval. Normally I do this via e-mail, which is very efficient and cost-effective.
Materials (excluding markup):
Vinyl: $130
Application tape: $50
Heated vehicle bay rent: $75
Misc.: $5 (Masking tape, stencil knife blades, paper towels, isopropyl alcohol)
Total: $260
Labor: 15.75 hours
This process works very well for several reasons. Clients love it, as they don’t have to “imagine” what the project will look like. I like it because I can accurately estimate the job and produce it knowing I’m going to get a fair price for my work. Inspecting the vehicle firsthand also allows me to look at the rivets, screws, moldings and so forth, which are factors that will come into play when applying the graphics. (This particular truck had very large rivets but not many of them, so there were only a few to deal with.)
I broke this job down into 10 steps and kept track of the time that went into each of them. It’s easy to miss a step or two when quoting a job, and if that happens, we won’t get paid for ‘em! Some of these steps are shown in the following photo sequence, and some aren’t.
Where the time goes
It all adds up, so I try to accurately account for the total time I put into each job.
I mark up materials like vinyl, application tape, and panels 100 percent.
Some steps are not pictured, but they are accounted for in my total time. This includes drive time both ways, 30 minutes; set up for installation/clean up and prep vehicle, 30 minutes; cleanup and put tools away, one hour 30 minutes; final paper work, 15 minutes.
The total time on this project was 15.75 hours. If you multiply that by a shop rate of $70 per hour, that’s $1102.50. The materials plus a 100 percent markup is $520, which gives you a total of $1622.50 plus tax. (I did not mark up the rental of the vehicle bay.) I use Estimate estimating software and it was close to this, too.
Randy Brunette operates SignCrafters in Eau Claire, Wisconsin, and does a wide variety of signs, banners, graphic design and web design.
This appeared in the May/June 2006 issue of SignCraft. Prices have been adjusted for inflation.
Photograph and measure truck: 15 minutes
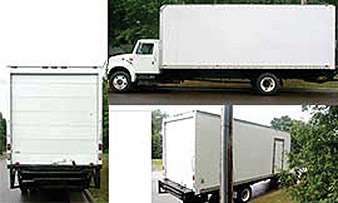
It doesn’t take long to get photos of the vehicle and record some key measurements. Straight-on photos are best. If the photos are a bit skewed on your computer screen, you can easily straighten them in Adobe Photoshop. You don’t need to measure everywhere, just get key measurements. Everything else will scale out proportionately.
Design/quote/revisions/e-mails/customer approval: 1.5 hours
 Because the only photo I had of the curb side was at an angle, I just copied the driver side, flipped it and added the door in Adobe Illustrator® and voila! This particular job went through two revisions. The customer first added their address and phone number, and later decided they wanted their Web site address also. Don’t forget to account for this often time-consuming part of the process.
Prep job file, check vinyl inventory and schedule install: 45 minutes

I design my jobs using Adobe Photoshop and Illustrator, then import files into the FlexiSign software for cutting. All text is converted to outlines first.
Cut, weed, mask, and trim: 5 hours

This step represents about the same time investment as applying everything. I try to keep graphics at a manageable size with nothing larger than 24-by-96 in. or so. I like to take a bit of extra time and care when trimming, too.
Get key measurements into Flexi and prep for install: 30 minutes

I’d be lost without my layout sheet, especially on those jobs where I’m working on such a large area! Accurate measurements are a very important part of getting the job done right the first time. Having an accurate “layout sheet” with good measurements is invaluable when working through an installation. I snip off actual vinyl samples from each job and apply them to my layout sheets for future reference.
Application: 5 hours

I did the entire job from a stepladder. Don’t forget to account for this extra time!

From concept to completion, this job went very smooth with no surprises. This vehicle had recently been repainted so some of the paint around rivets lifted when I removed the masking, but it was minor.
